
How Porcelain Patios Are Built
How Porcelain Patios Are Built
A beautiful porcelain patio depends on far more than the paving visible at the surface. Excavation depth, ground preparation, sub-base compaction, drainage, edge restraint and the laying method all affect how well the finished patio performs.
This guide explains the main stages involved in constructing a professionally installed porcelain patio. Every garden presents different ground conditions, levels and drainage requirements, so the final construction detail should always be designed around the individual site.
If you are still choosing the surface for your garden, explore our porcelain paving collection or compare the available options in our paving comparison guide.
What Is Beneath a Porcelain Patio?
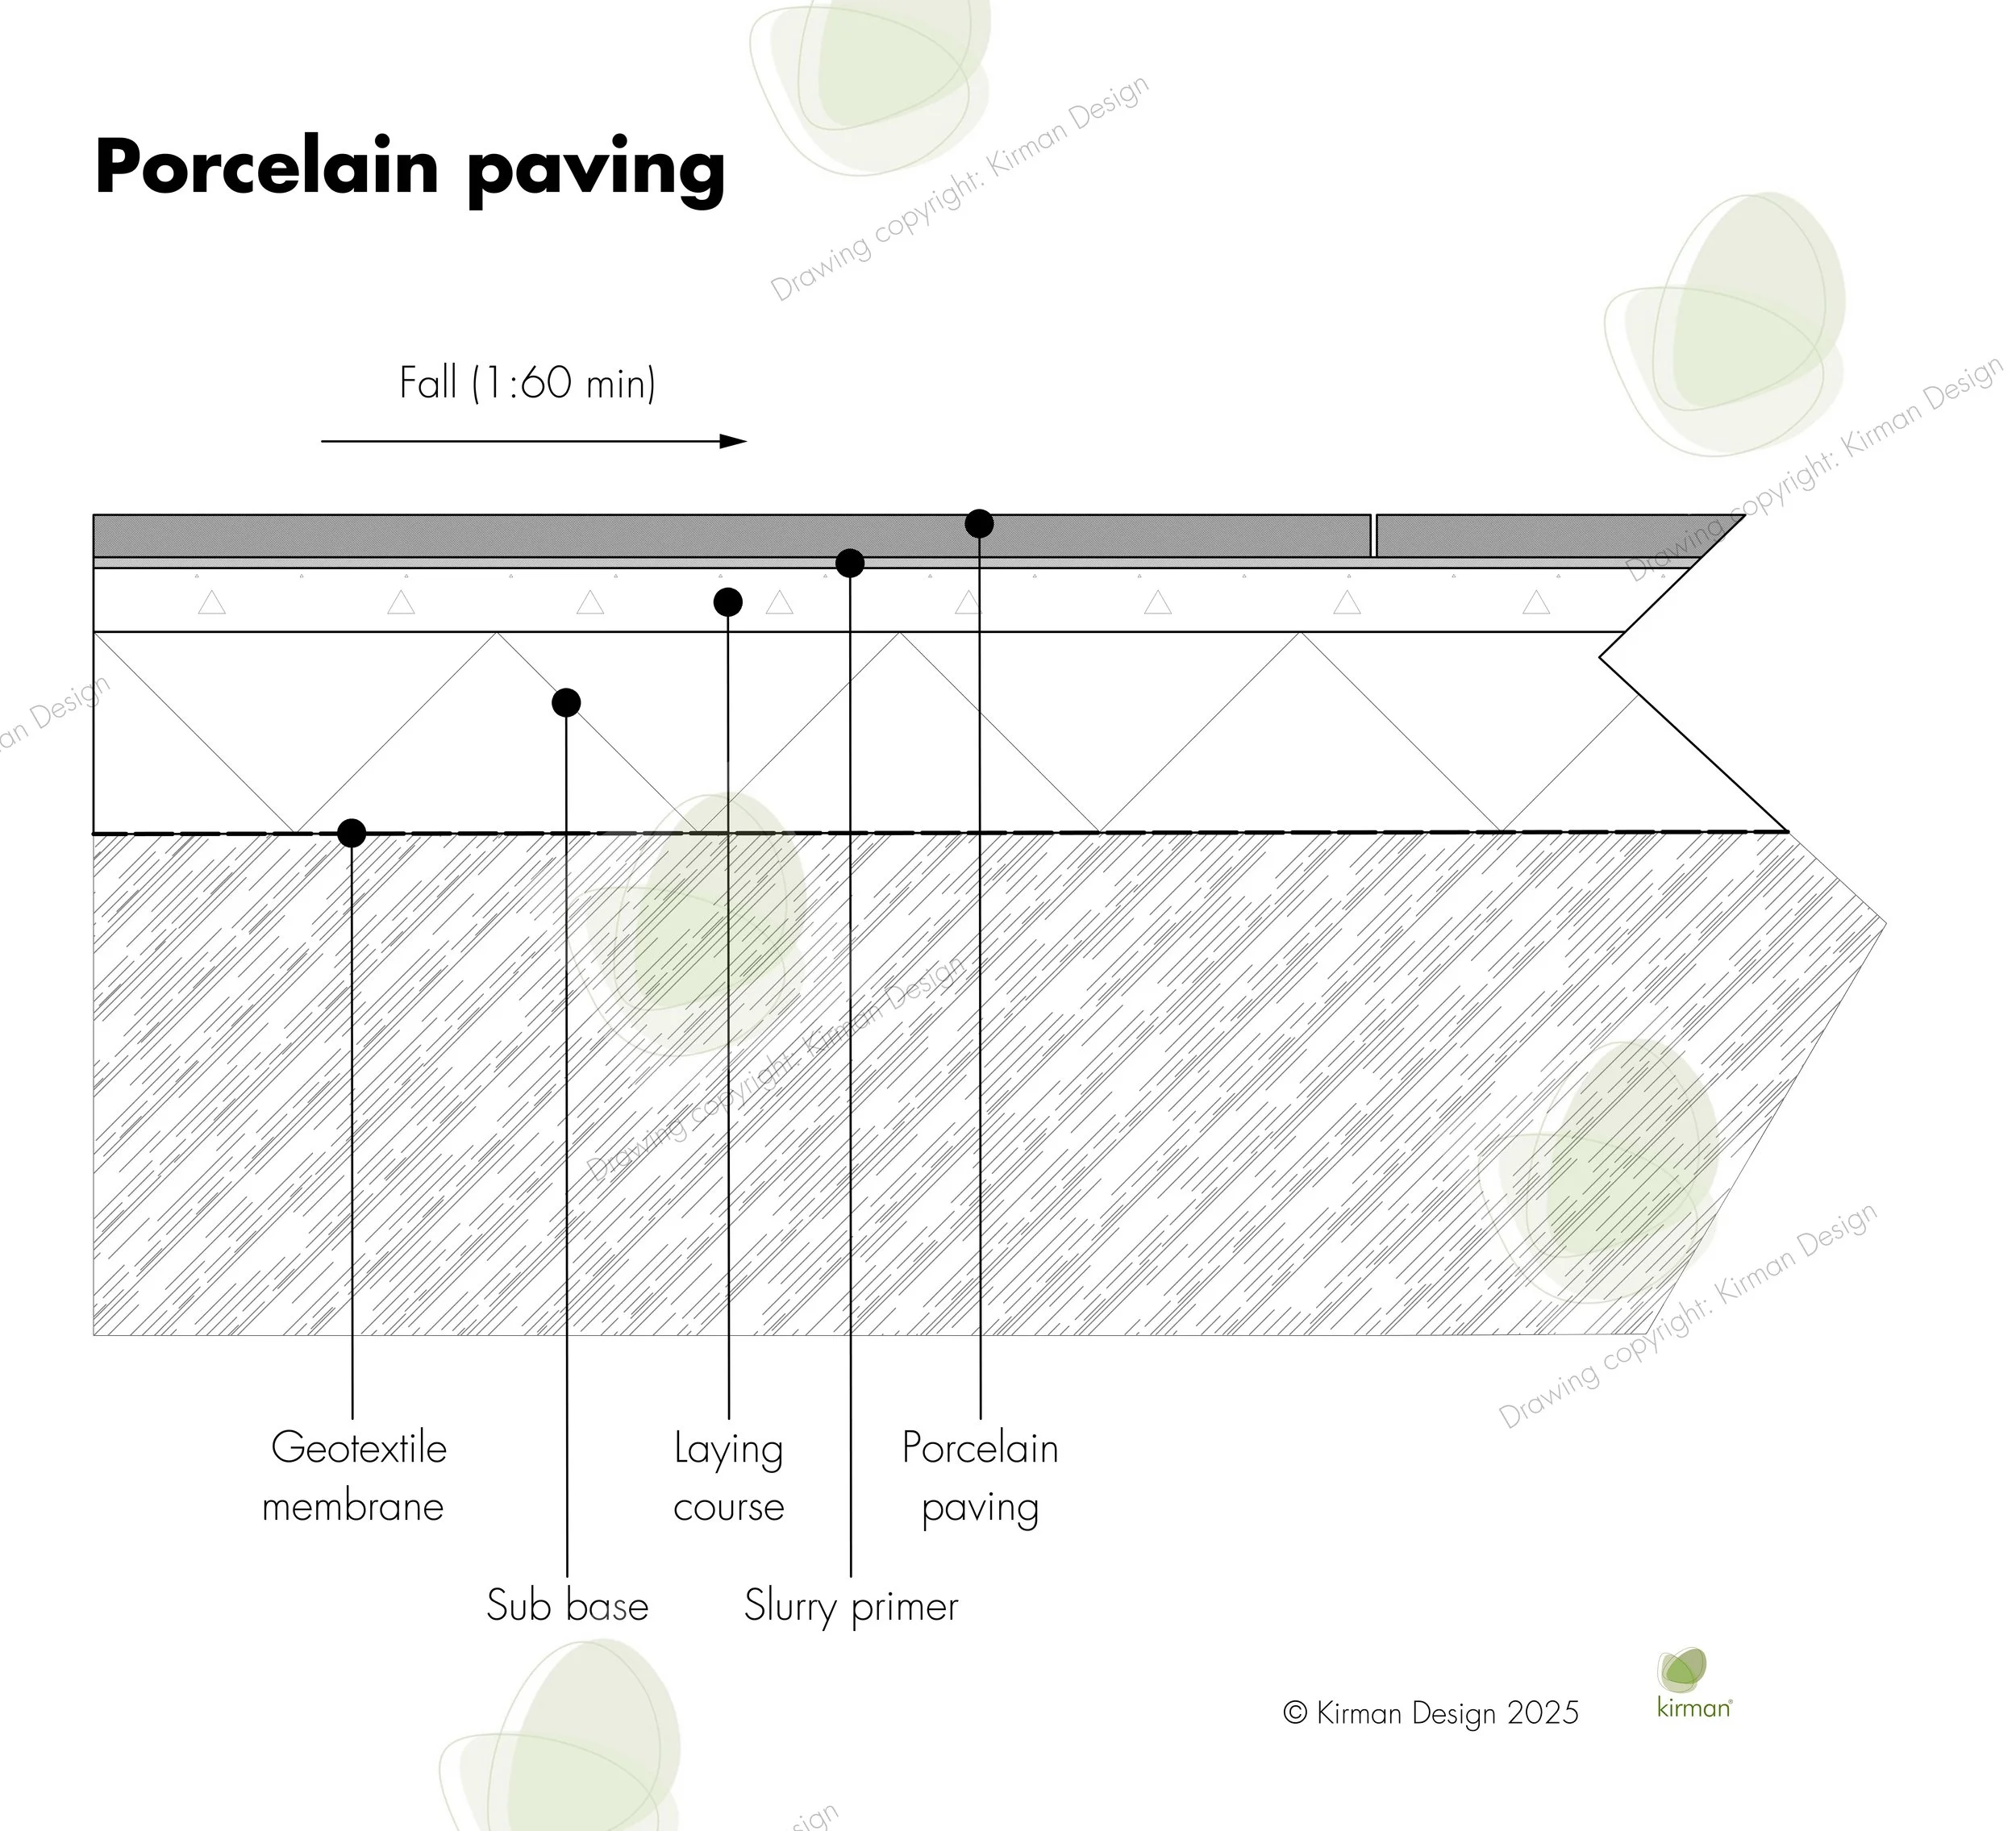
A correctly constructed porcelain patio usually contains several layers. Together, these create a stable, free-draining and accurately levelled surface.
A typical patio construction may include:
Prepared and compacted ground.
A geotextile membrane where ground conditions require one.
A compacted granular sub-base.
A full mortar laying bed.
Slurry primer applied to the underside of the porcelain.
Exterior-grade porcelain paving.
Suitable jointing or grouting material.
Secure edge restraints.
Drainage channels where required.
The exact depths and specifications depend on the soil, intended use, existing levels and local drainage conditions.
Stage One: Assessing the Site
Before any excavation begins, the site needs to be assessed carefully.
The installer must establish the proposed finished patio level, the direction in which surface water will travel and how the patio will relate to doors, paths, lawns, planting beds and existing structures.
Particular attention should be paid to:
Damp-proof course levels.
Door thresholds.
Existing drains and inspection chambers.
Changes in garden level.
Retaining walls and raised edges.
Access for excavation and waste removal.
Where rainwater can safely discharge.
The stability and drainage of the existing ground.
These decisions should be made before paving is ordered or excavation starts.
Stage Two: Excavation
The patio area is excavated to allow sufficient depth for the sub-base, mortar bed and paving.
The excavation depth will vary according to the ground conditions and the proposed finished level. Soft, disturbed or poorly drained ground may require additional excavation and a more substantial construction.
Organic material, loose soil and unsuitable material should be removed. The ground beneath the patio must provide a firm and consistent formation before the construction layers are installed.
Stage Three: Preparing the Ground
Once excavation is complete, the exposed ground is levelled and compacted.
A geotextile membrane may be installed where it is needed to separate the sub-base from the soil beneath. This can help prevent the stone from being pressed into soft ground and reduce contamination between the different construction layers.
A membrane is not a replacement for proper excavation, drainage or compaction. Its suitability depends on the conditions found on site.
Typical Porcelain Patio Construction
Stage Four: Installing the Sub-Base
The sub-base is one of the most important parts of the patio. It distributes weight, provides stability and creates a firm foundation for the paving above.
A suitable compactable granular material, commonly MOT Type 1 or an appropriate equivalent, is normally installed in layers. Each layer is compacted thoroughly using suitable mechanical equipment.
The required depth depends on the ground and how the area will be used. A domestic pedestrian patio will not necessarily require the same construction as a driveway or an area carrying unusually heavy loads.
An inadequately prepared or poorly compacted sub-base can lead to settlement, cracked joints and uneven paving.
Stage Five: Creating the Correct Falls
Outdoor porcelain paving must be laid to a controlled fall so that rainwater can drain from the surface.
The fall should direct water away from buildings and towards a safe drainage point, planting area or suitable channel drain. A fall of approximately 1:60 is commonly used, although the appropriate gradient depends on the paving, site levels and drainage design.
Falls should be formed through the construction, not created by applying a thin or inconsistent mortar bed beneath individual slabs.
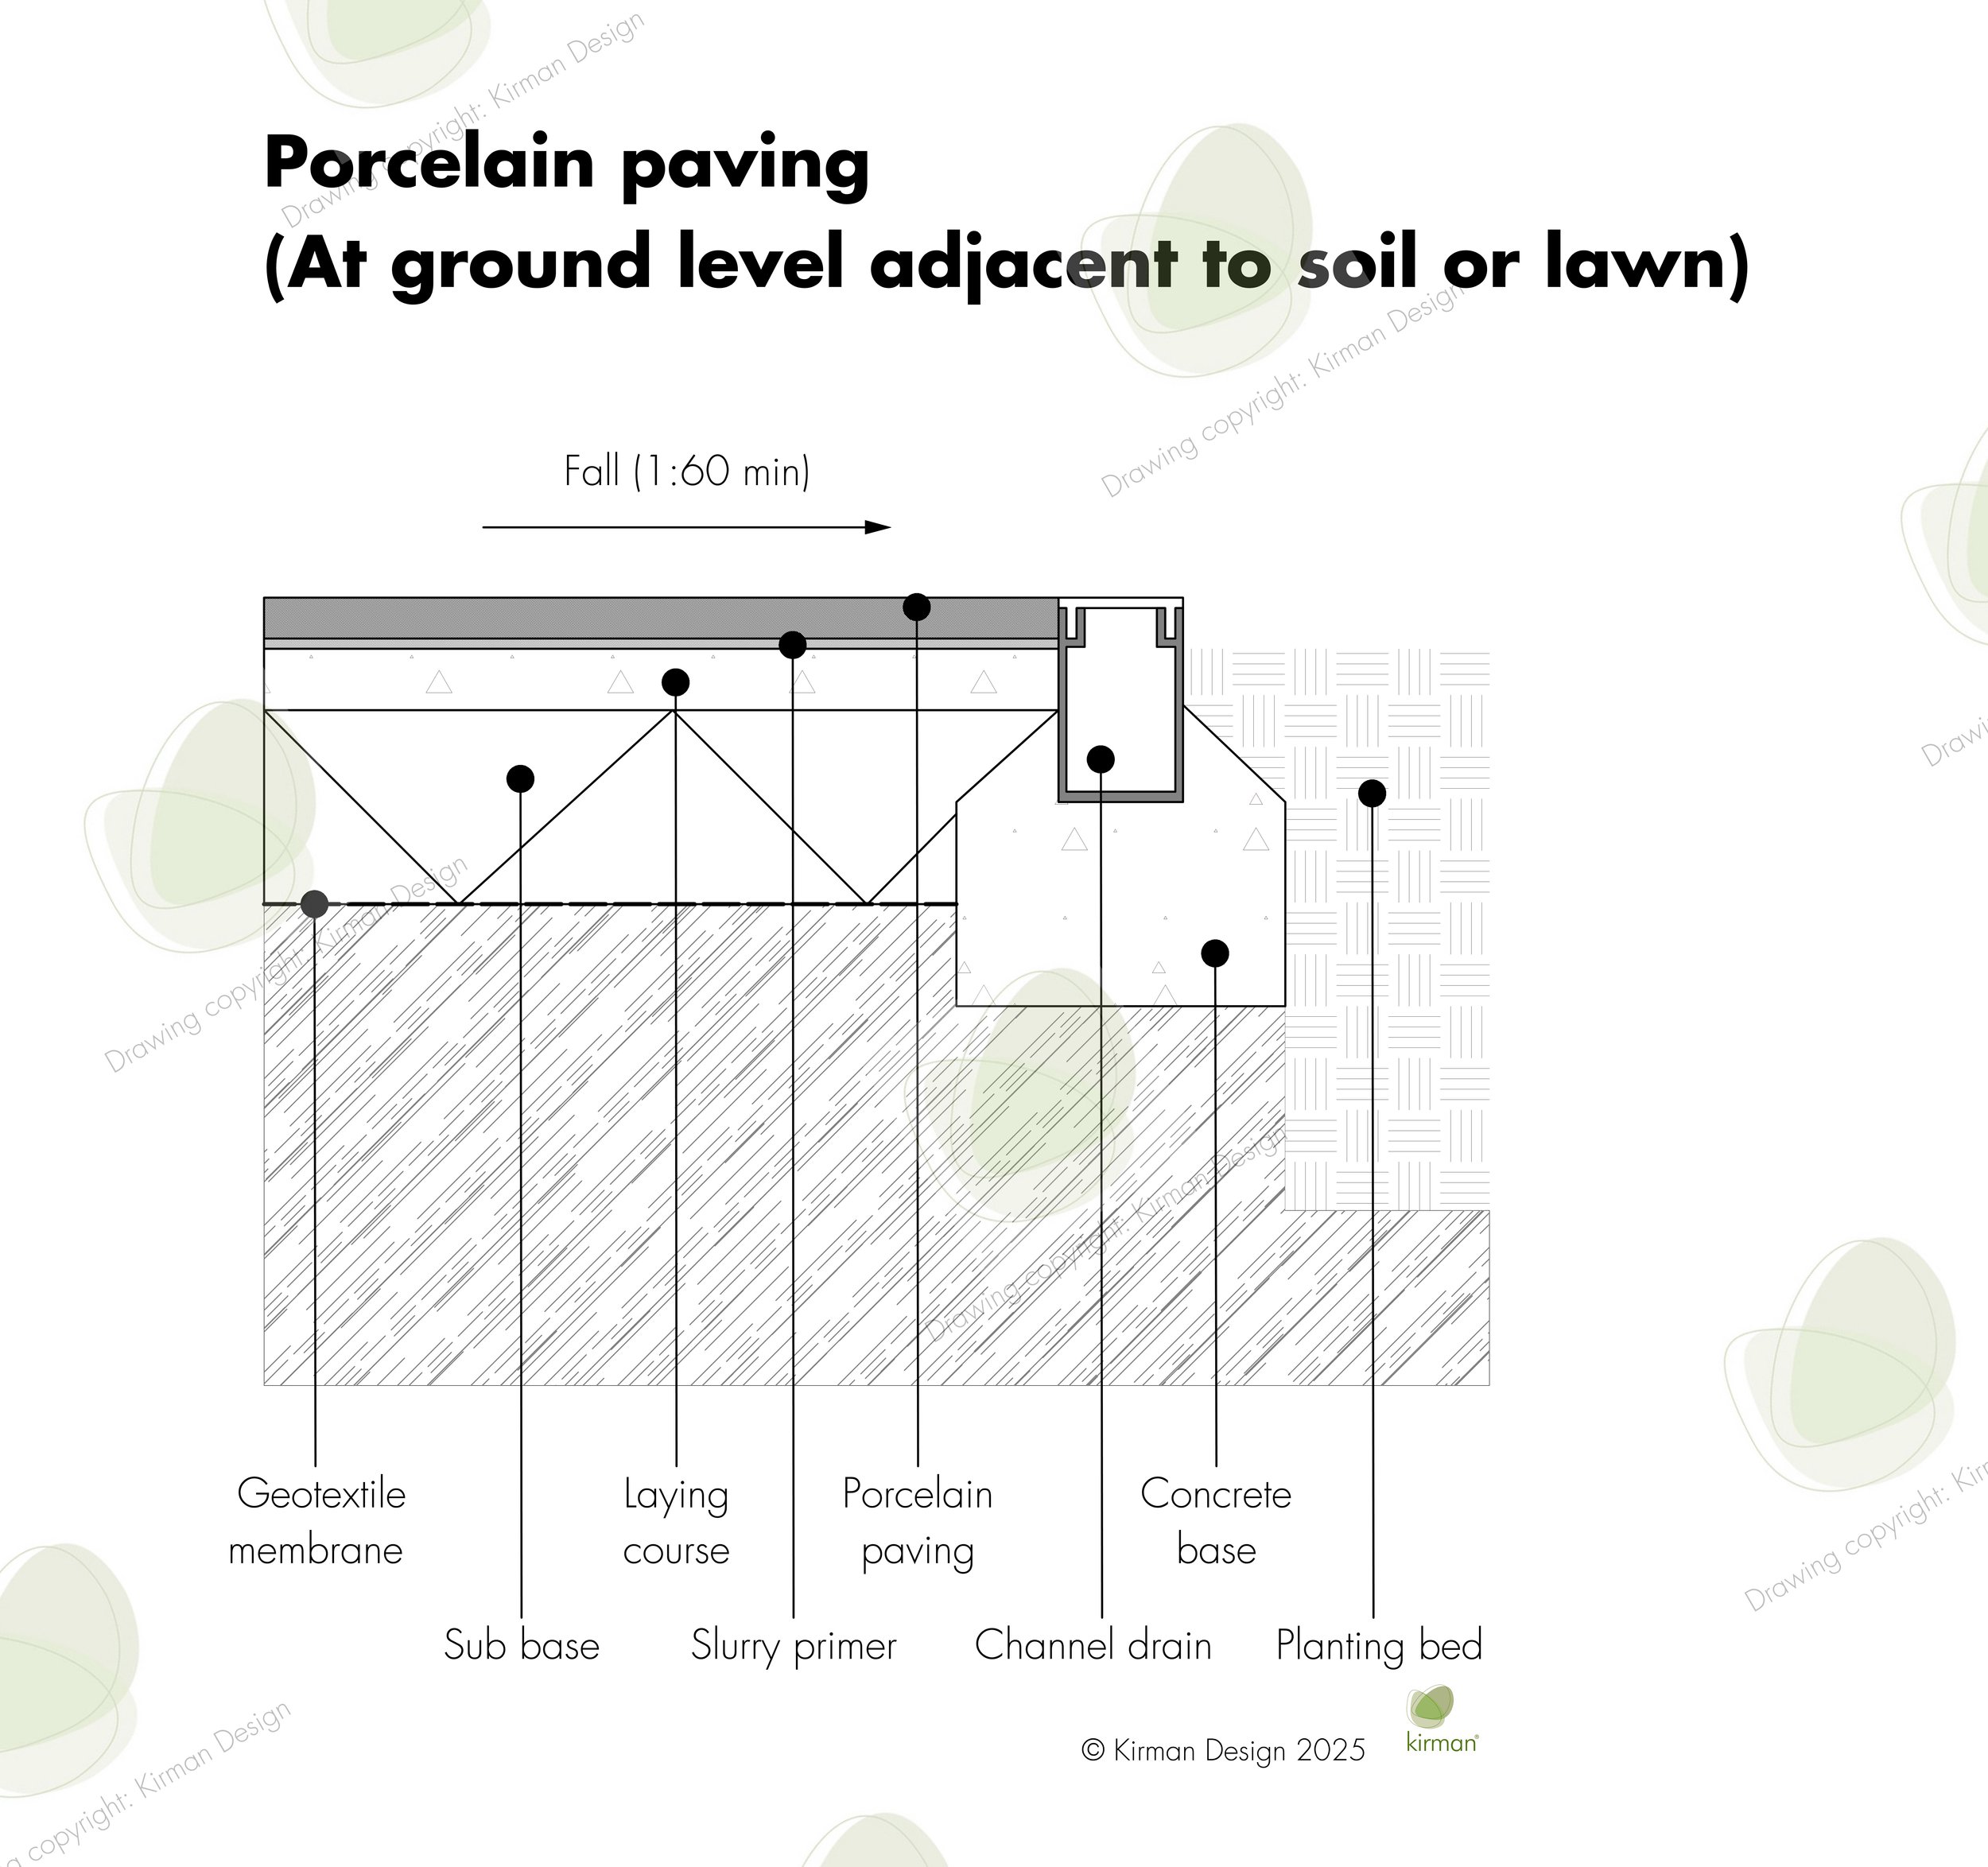
Patio Construction Beside a Lawn or Planting Bed
Where paving meets a lawn or planted border, the edge of the patio must be supported. Without a secure edge detail, the sub-base and mortar bed can move or erode over time.
The finished paving should meet the adjoining surface neatly while still allowing water to drain safely. The final levels must also avoid directing excessive surface water into borders where it could cause erosion or waterlogging.
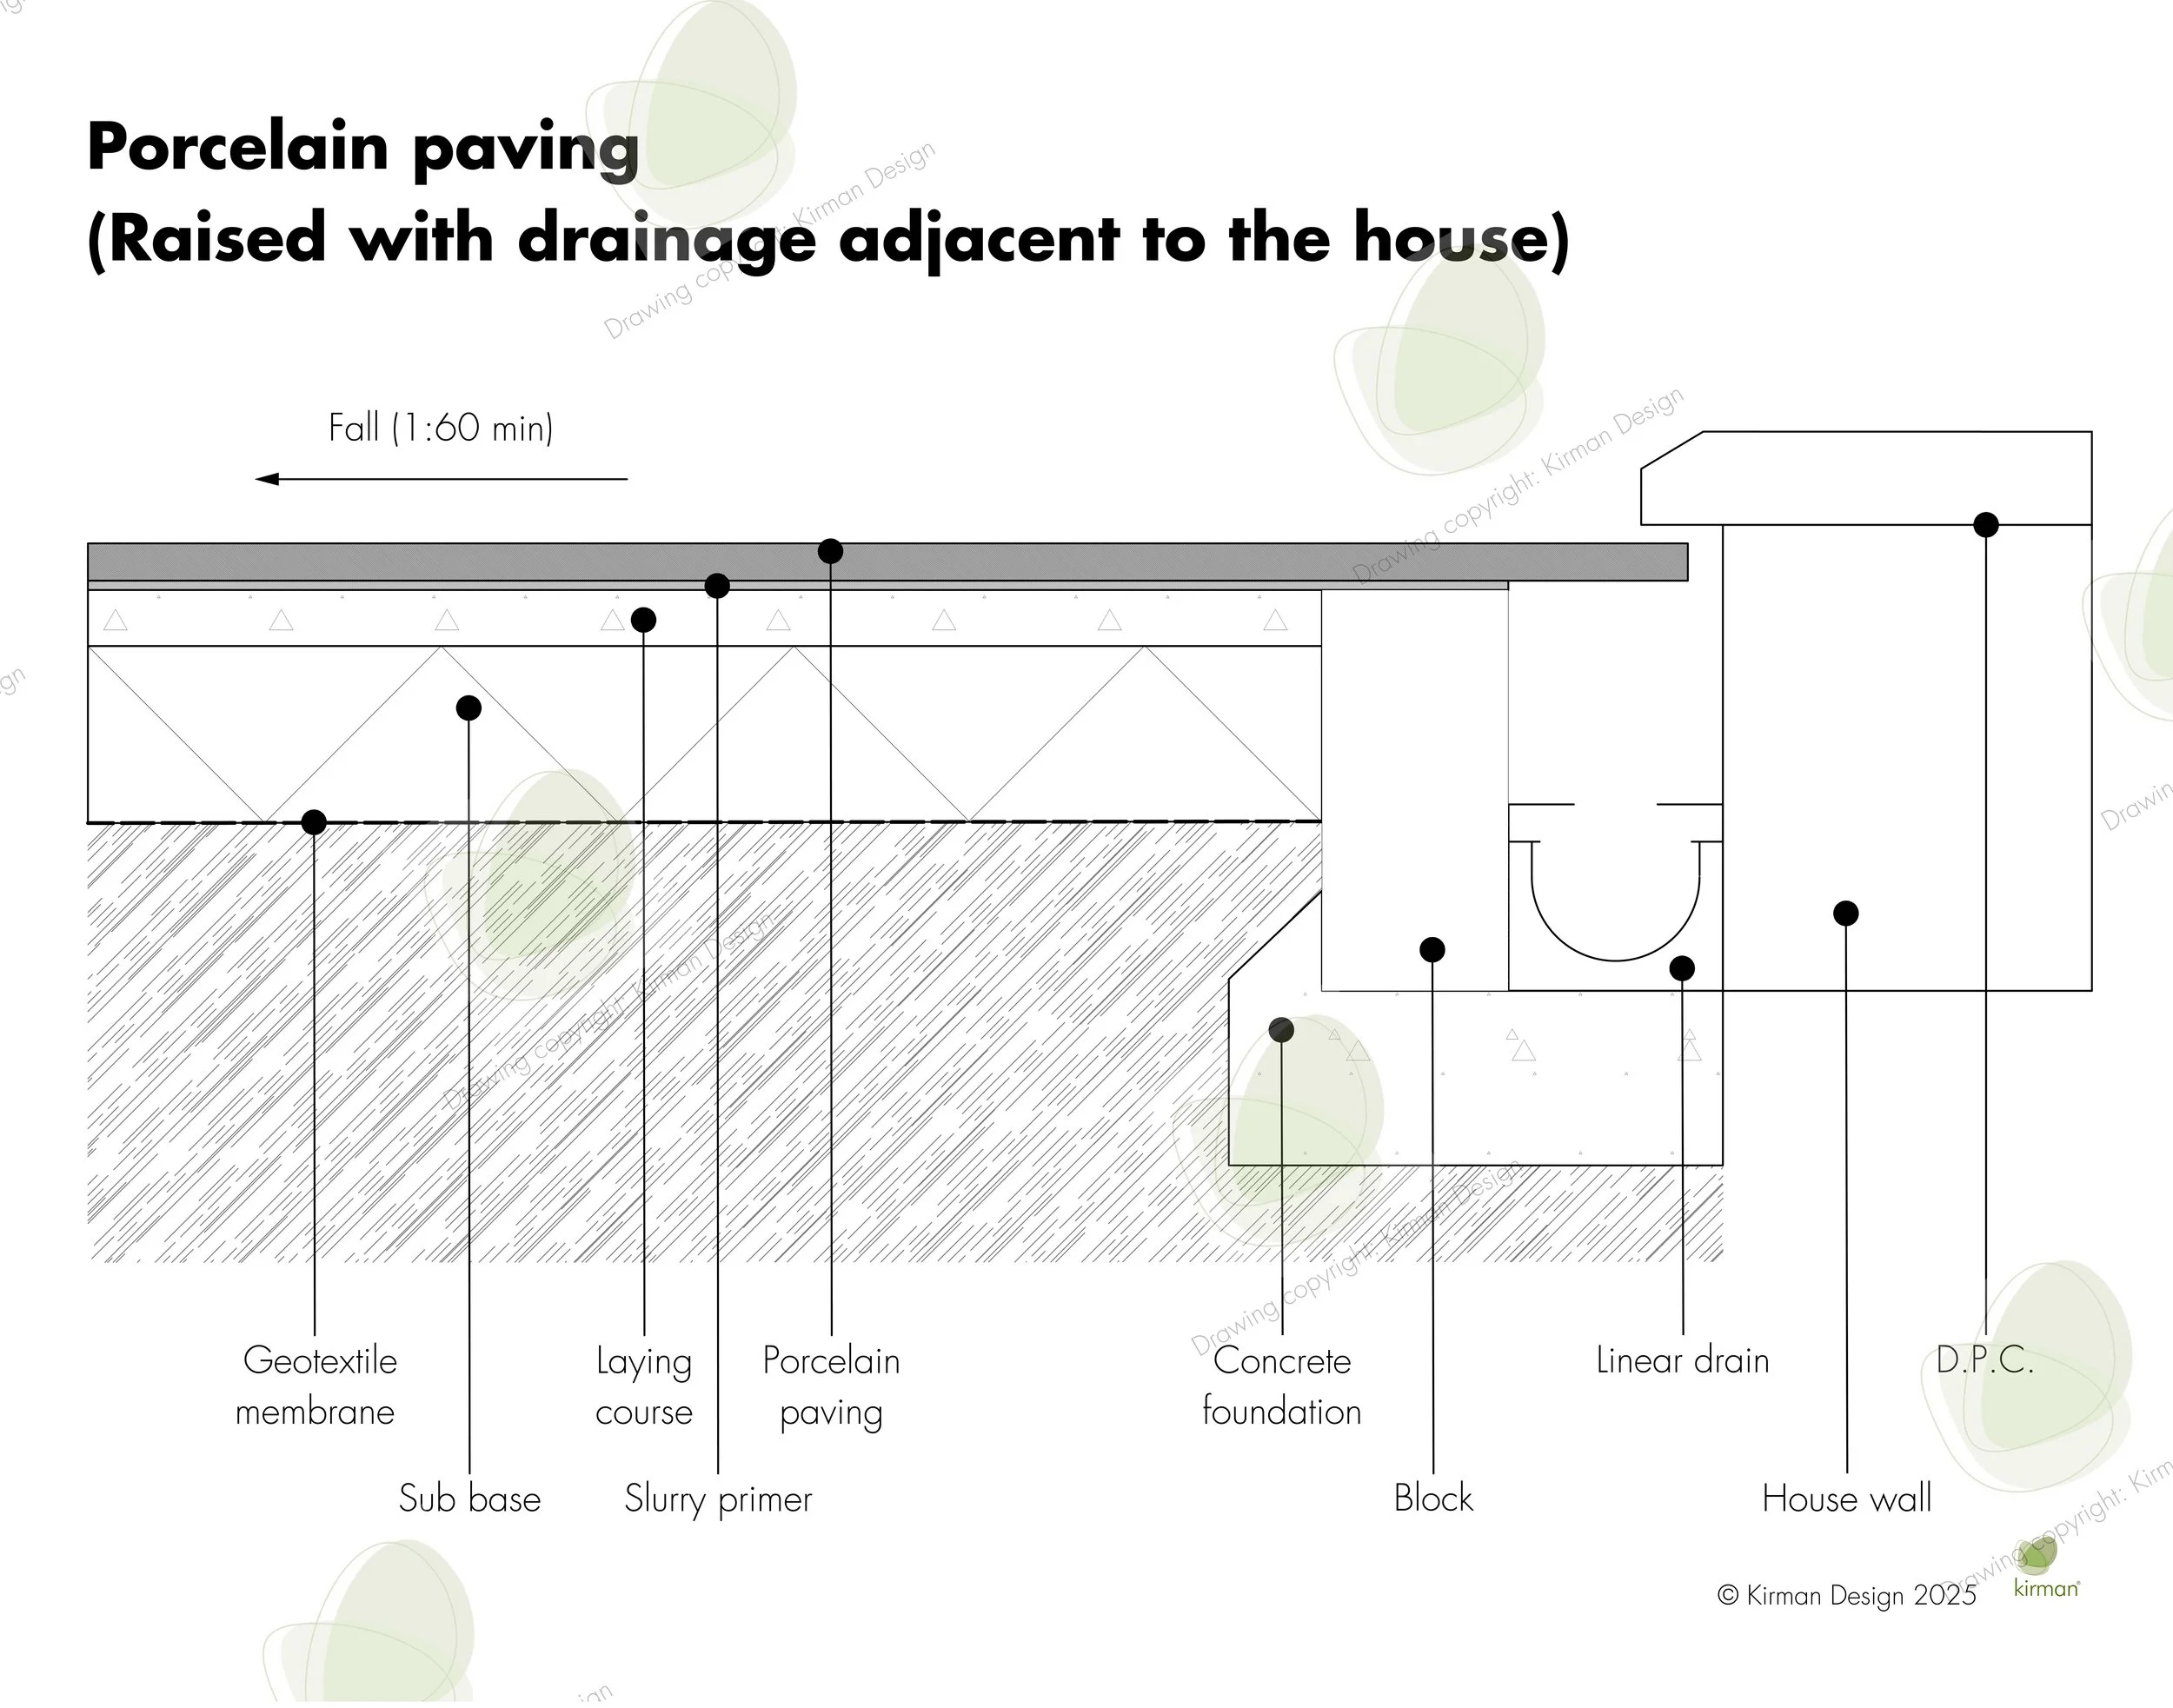
Patio Construction Beside a House
Paving next to a house requires particularly careful level and drainage planning.
The finished patio should normally remain an appropriate distance below the damp-proof course unless a properly designed alternative detail is used. Surface water must be directed away from the building rather than towards the wall or door threshold.
A linear channel drain may be required beside the building or across a doorway where the available levels do not provide sufficient clearance.
For more information about channels and surface-water management, visit our patio drainage guide.
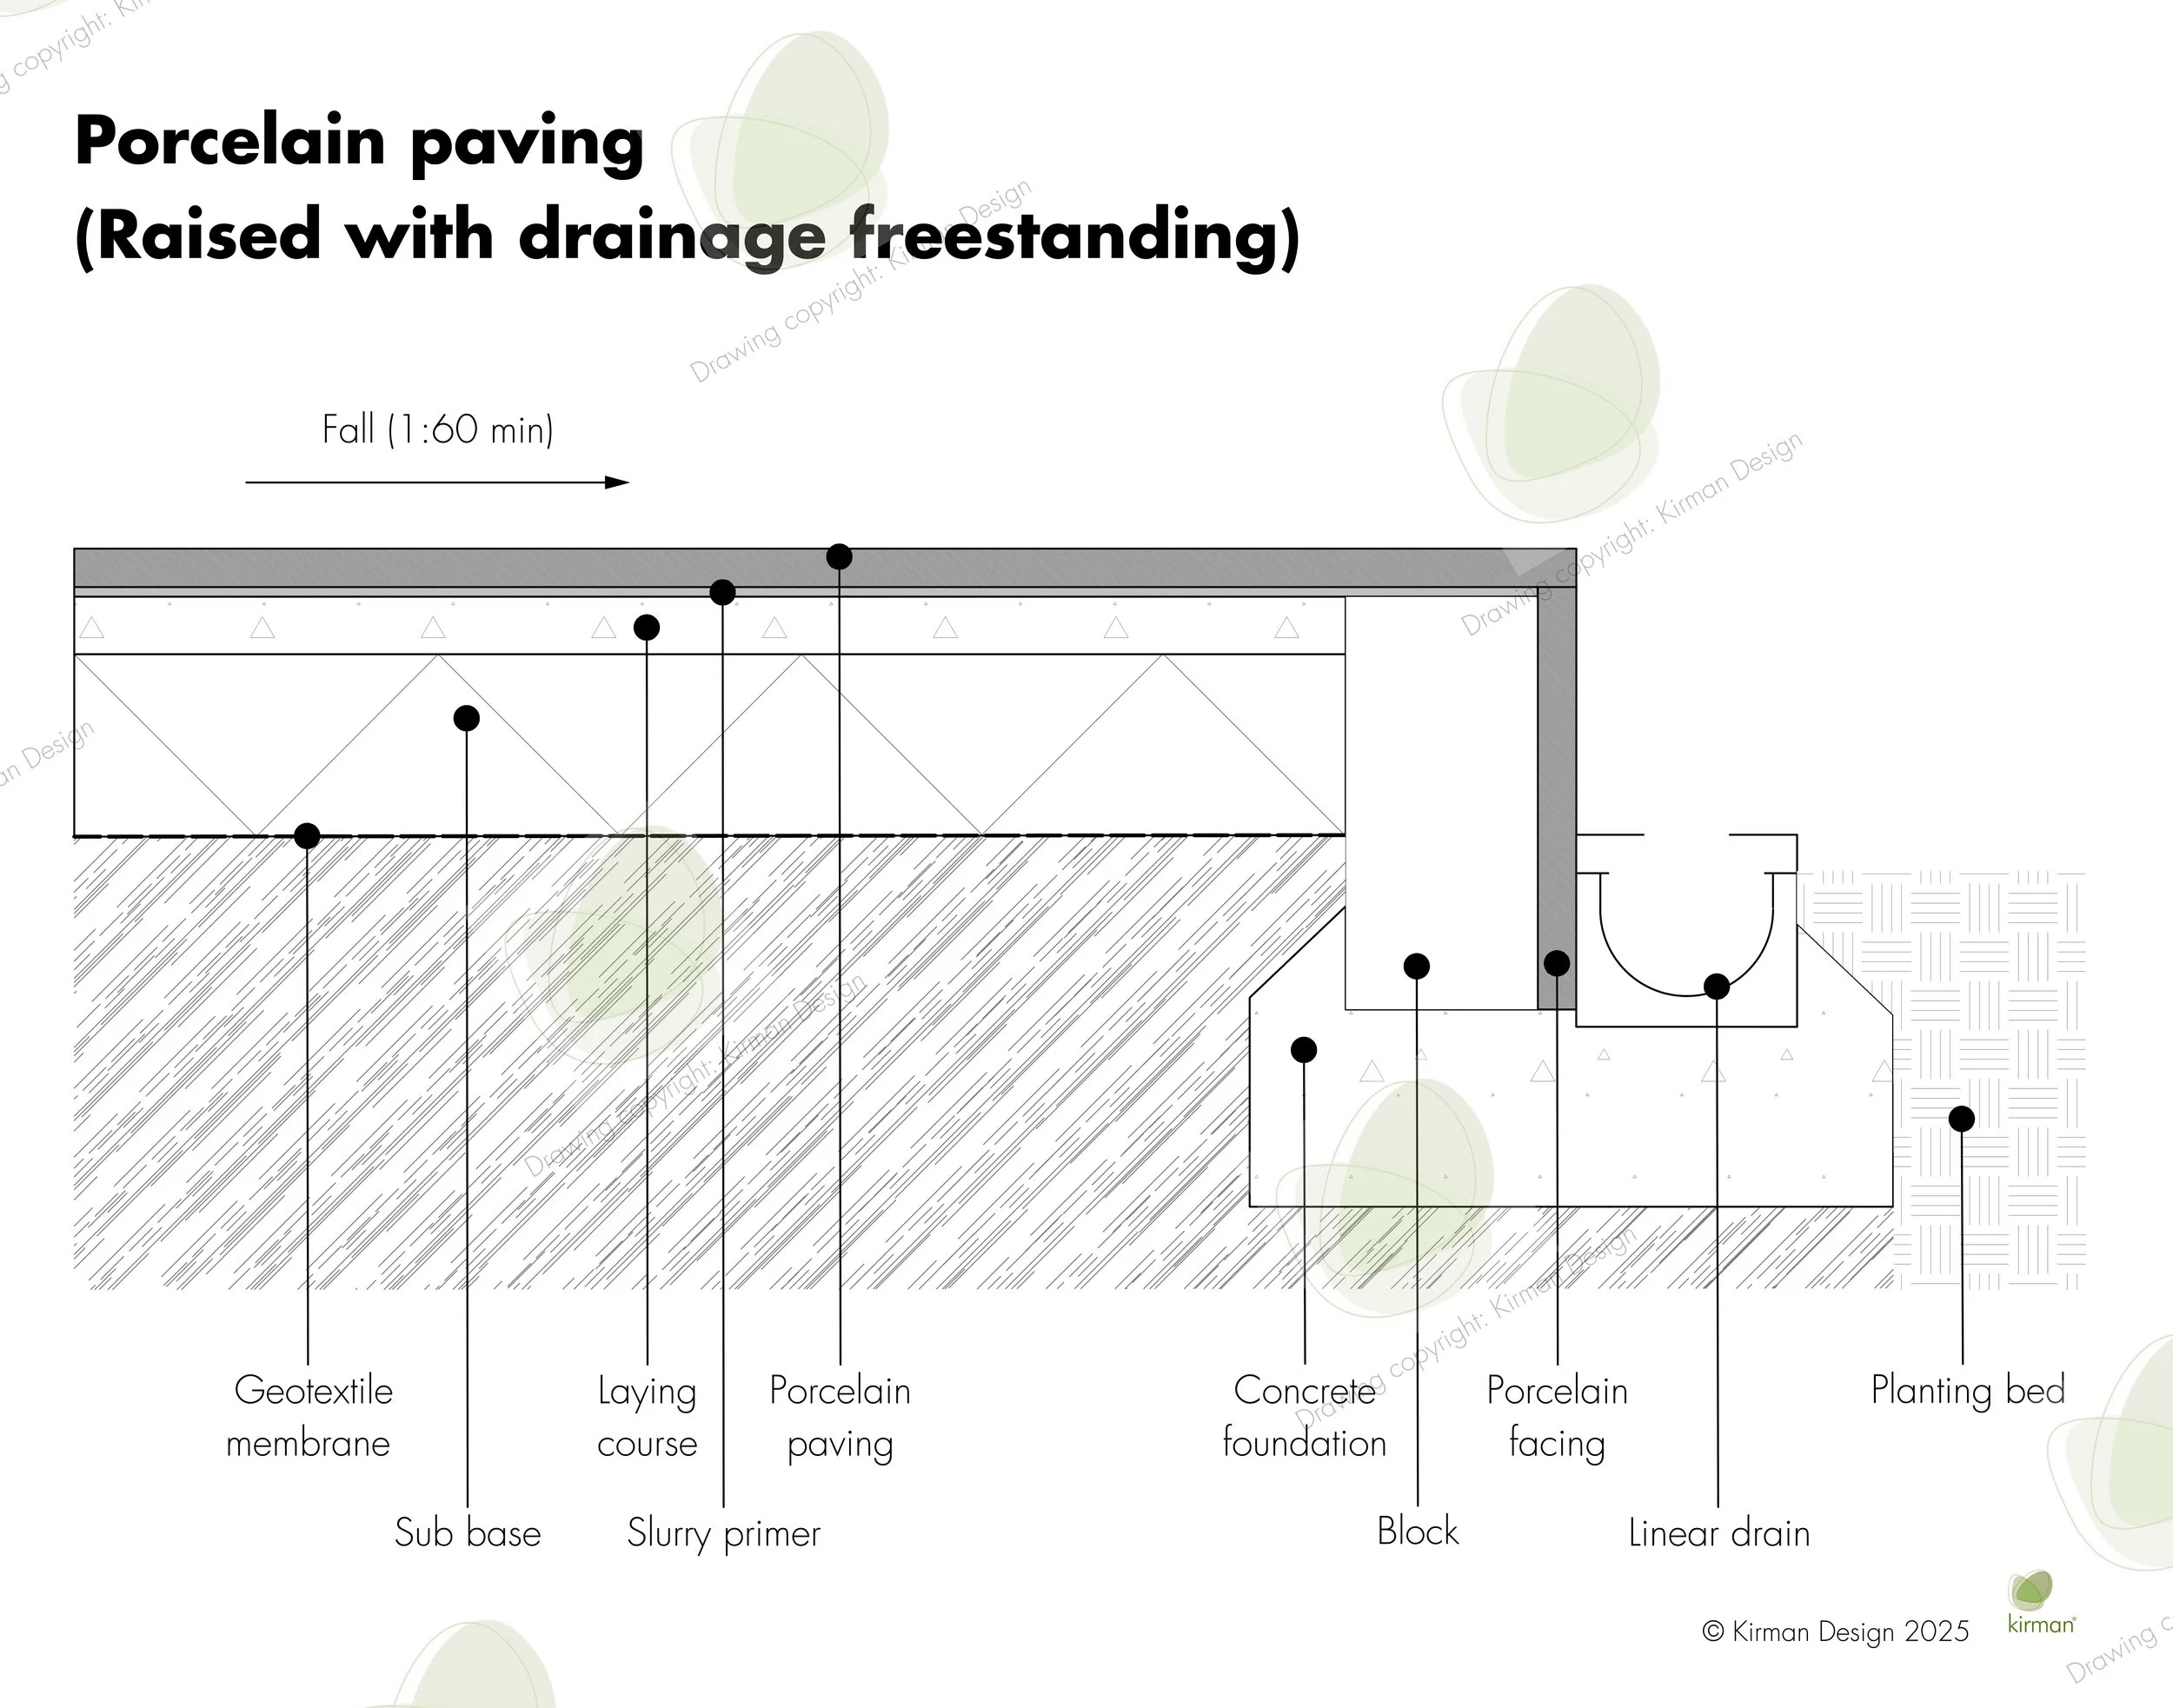
Raised Patios Beside Buildings
Where a raised patio meets a house, level management becomes more complex. The design must protect the damp-proof course, avoid bridging the building’s moisture protection and control water beside the wall.
A linear drain, retaining construction or specialist threshold detail may be needed. These situations should be assessed individually rather than relying on a standard construction detail.
Raised Patios Beside Buildings
Where a raised patio meets a house, level management becomes more complex. The design must protect the damp-proof course, avoid bridging the building’s moisture protection and control water beside the wall.
A linear drain, retaining construction or specialist threshold detail may be needed. These situations should be assessed individually rather than relying on a standard construction detail.

Stage Nine: Jointing the Paving
Once the paving has been laid and the bedding materials have cured sufficiently, the joints can be filled with a product suitable for exterior porcelain.
The joints must be clean and prepared in accordance with the jointing-product instructions. Residue should be removed from the porcelain before it cures.
The correct jointing material helps protect the edges of the slabs, accommodates normal external conditions and gives the finished patio a consistent appearance.
Stage Ten: Finishing and Cleaning
The completed patio should be checked for alignment, stability, drainage and workmanship.
Any construction residue should be removed using cleaning products appropriate for porcelain. Aggressive acids or unsuitable chemicals should not be used without checking the paving manufacturer’s guidance.
The surrounding soil, lawns, planting beds and access routes should then be reinstated as required.
Why Professional Patio Construction Matters
Porcelain paving is strong, durable and relatively easy to maintain once installed, but it is less forgiving of poor groundwork and incorrect laying methods.
Common problems associated with inadequate construction include:
Loose or rocking slabs.
Cracked or failed joints.
Standing water.
Water running towards the house.
Uneven settlement.
Unsupported patio edges.
Hollow areas beneath slabs.
Staining from inappropriate installation materials.
Poorly positioned or untidy cuts.
A well-built patio begins below ground. Investing in the correct preparation and installation protects both the paving and the wider garden.
Plan the Cost of Your Porcelain Patio
If you are considering a new patio, our patio cost calculator can help you explore likely sizes, porcelain finishes, site conditions and installation requirements.
You can also read our porcelain paving FAQs for answers to common questions about choosing, installing and maintaining porcelain paving.
Porcelain Patio Installation Across North West England
Landscaping Emporium supplies carefully selected porcelain paving with the option of professional installation by the Kirman Design landscaping team.
We undertake patio projects across Lancashire, Greater Manchester, Cheshire, Merseyside and surrounding areas of North West England. Every installation is assessed individually so that the groundwork, drainage and construction suit the particular garden.
For regional information, visit our North West paving installation page.
Discuss Your Patio Project
Whether you already know which porcelain you prefer or need advice on layout, levels and drainage, our team can help you plan a patio that works with the rest of your garden.
Estimate your patio project or contact Landscaping Emporium to discuss professional supply and installation.